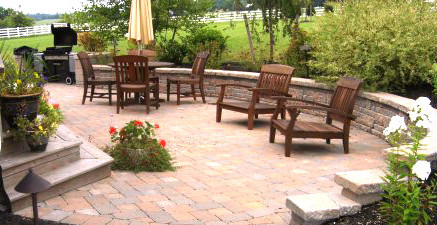
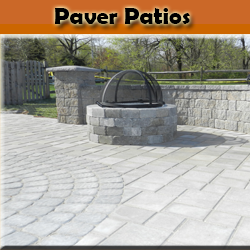
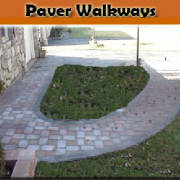
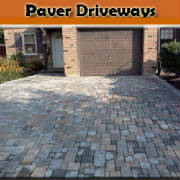
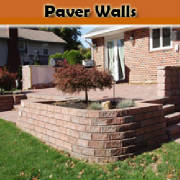
Our Pavers Installation Process
Step 1 - Initial Meeting
After making an appointment with one of our office associates,
we will send out Solution People Inc.’s Representative to your house. At this initial meeting, we will take measurements,
pictures, listen to your requests and make suggestions for your hardscaping project
Step 2 - Design
Consultation
Based
on the information gathered from the initial meeting, we will develop a custom to scale plan with call outs and information
to convey the finished concept. With this design will be presented an itemized estimate detailing what work is to be done
and for how much. We provide sample of the material that we specify to help you visualize your new pavers area. Once the plans
are finalized and the contract signed, it's off to construction.
Step 3- First Day of Construction
On day one just like every other day of construction, Solution
People Inc. employees will arrive at the job site with a construction foreman to direct the work for the day. The Foreman
is our primary link between the office and you the home owner, they are there to answer any questions or concerns you may
have about your new project.
Step 4 - The Following Days of Construction
Our in house crew will work to make your landscape dream a
reality. We will be there 6 days a week (weather permitting) to get your job done on schedule. Every morning, we start with
communication on what is to be done for the day and every evening we leave a clean site for our customers. If changes need
to be made, no problem we specialize in special requests. More details on our construction process...
Step 5 - Final Walkthrough
After the last installation steps are completed, we will schedule a final
walkthrough to make sure the job is everything you dreamed it could be. At that time, we would ask for the final payment and
you can get to enjoy that new yard, or driveway.
Step 6 - Enjoying your new Landscape
With the job done, now you can really get to what's important,
enjoying your new hardscape. You can also breathe easy knowing that you have a 5 year warranty on hardscape installation and
a life time manufacturer's warranty on material. We will even provide you with information on how to care for your hardscape
elements.
Our Construction process follows all industry
standards and manufacturer’s recommendations for long lasting interlocking pavers
The first step - Success starts with preparation
This process includes the excavation of existing concrete and soil and the careful setting of grades. Finally,
our hardscape experts will carefully compact the earth to ensure an even, steady surface.
=>Demolition and disposal of existing
concrete
=>Excavation to appropriate depth – a minimum of
6" of compacted aggregate base is recommended for patios and walkways, and 10" for residential driveways where freeze-thaw
conditions exist. Add 3 3/8 inches for the depth of the bedding sand and the thickness of a standard 2 2/8" paver
to determine the total depth to which we will excavate. Excavation is typically 6" wider than the finished area’s
dimensions on sides where edge restraint is to be used.
=>Set Grades - slope and
grade are important to ensure proper runoff. It is best to plan at least a 1⁄4" per foot drop, but not to exceed
1⁄2" per foot.
=>Compact
soil and base material - First, we run a plate compactor over the excavated area, making sure that soil does not
get stuck to the bottom of the plate tamper and overlapping each pass by about 4". Compaction is performed in one direction
(North-South), then a second time at a right angle (East-West) to the first compaction. It is recommended that a separation
fabric, such as Mirafi® 500X, be laid down over the compacted subgrade. Then we spread modified stone base material out
evenly in a 2" layer.
The key to successfully installing
paver walkways, driveways, or patios is careful preparation – and that’s where Solution People Inc. truly excels.
Before we place any pavers, we go through a rigorous pre-installation process to ensure that your pavers stay beautiful for
years to come.
The second step to ensuring durable
& beautiful interlocking paving stones is laying down the pavers
After the site has been properly
prepared, a stable base will be installed for your new driveway, walkway, patio, or pool deck. Solution People Inc. hardscape
installers are professionally trained and will ensure that this step is completed to perfection!
=> Apply sand-setting base material
- According to the Interlocking Concrete Pavement Institute (ICPI), coarse concrete sand, i.e., sand used to make ready-mixed
concrete, is recommended for the setting bed. Do not use stone dust or screenings for the setting bed. These materials do
not drain water and become soft over time. Pavers will not seat properly in them when compacted. This will prevent interlock.
=> Screed sand base - Lay the screed guides (1"
outside diameter electrical conduit, strips of wood or other suitable rigid material) on top of the compacted base material
4'-6' apart and parallel. Evenly distribute a quantity of bedding sand between the guides and drag the 6-8 ft. 2"x4"
or 2"x6" over the guides to create a smooth, even layer of sand, striking off any excess. When the pavers are set
on the sand and compacted, the 1" of sand will compress to 1⁄2" to 5⁄8"
thickness.
=> Lay down paver stones into the selected pattern
- carefully install the driveway pavers on the sand according to the pattern you have chosen, paying strict attention to the
alignment of the rows and the straightness of the joint lines.
The third steps is fitting paver stones and or building a pool deck
When properly
installed and fitted, which requires precision cutting, interlocking paving stones are virtually maintenance-free.
=>Saw Cut
Pavers - Place paver borders: not only is the border an attractive frame when building a pool deck,
patio or driveway, it also helps contain the pattern you have selected.
=>Place Paver Borders - not only is the border
an attractive frame when building a pool deck, patio or driveway, it also helps contain the pattern you have selected.
=>Install Edge Restraint – an appropriate edge
restrain is installed along all edges that are not up against a permanent structure. The restraint material is installed entirely
on the compacted aggregate base.
Finish
- the last step, but definitely not the least!
=>Plate Vibrate once - compact and vibrate the paving stones into the sand bed, using a specially designed plate tamper with Mirafi 500X or a similar medium between the tamper and the
pavers.
=>Sweep Sand - apply another layer
of sand on top of the compacted pavers, and carefully sweep it into every crack and crevice. This special sand (polymeric
sand), and its correct application, ensures equal spacing so that your interlocking paving stones will not move or bunch up
together. The spacers on the sides keep the paving stones spaced properly.
=>Plate Vibrate twice - compact the pavers again, using
the plate vibrator. This step is essential as it forces more sand into the joints and creates the interlock process, transforming
the surface into one solid unit, giving it the strength to easily support nearly any weight you're likely to put upon
it.
=>Clean Up - wash down the area which will also allow us to verify that the grades were properly set,
hence no paddling.
Proper finishing is a must to ensure your
new interlocking paving stones will last.